Every renovation finishes the same way. Sixty clips sitting on your phone, a handful of before shots you nearly forgot to take, and a client or an audience who would rather watch the room than scroll through six flat photographs of it. Then you open a video editor and the second job starts.
The free ones stamp a logo in the corner of your work. The capable ones want a subscription before they will let you export in 1080p. And a surprising number of the browser tools that call themselves editors are really a form with a preview window: pick a layout, drop in three photos, done.
I have been using PandaVid, a free online video editor that runs in a browser tab, and it sits in a different category from the rest. It gives you a proper multi-track timeline, it writes your captions for you, and the file you download has nothing stamped on it. This is what it does, where the AI parts actually run, and what I would not use it for.
The short version of how it is free
Most browser editors send your footage to a render farm, which is expensive, which is why you eventually meet a paywall. PandaVid does the work on your own computer instead. Playback, transcription, the voiceover generation and the final encode all happen on your machine, in the tab.
That single decision is why the feature list below is free rather than a trial. There is no render server to pay for, so there is no per-video bill to pass on. The trade is real and I will come back to it: your laptop does the work, so a long 4K timeline on an old machine will feel like a long 4K timeline on an old machine.
The timeline works the way a desktop editor does
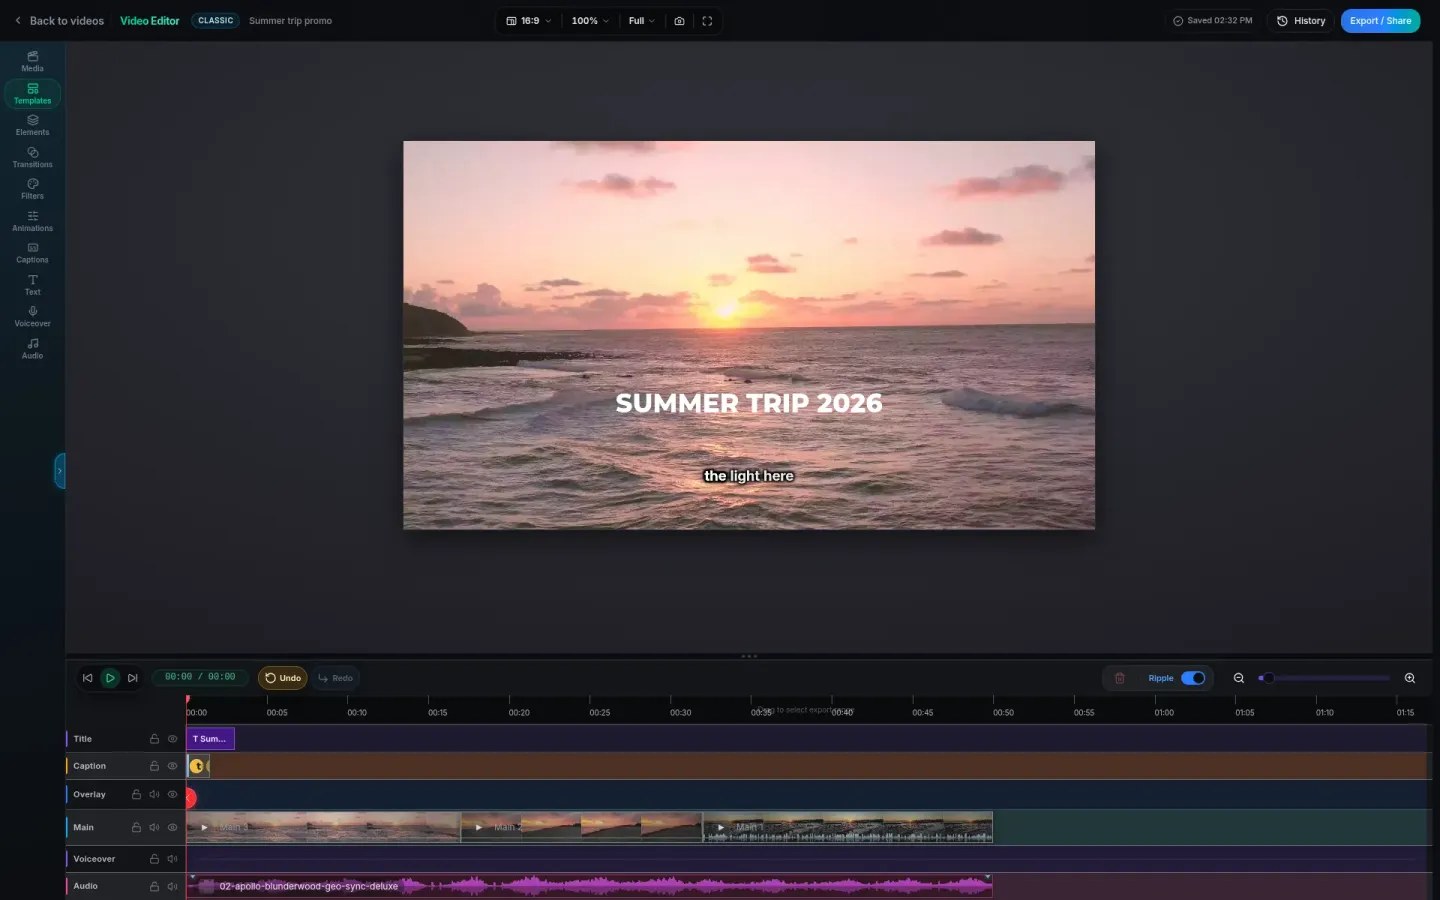
Six lanes to start with. Video sits on Main, a second image or video layer sits on Overlay, and titles, captions, voiceover and music each get a lane of their own. Detach the audio from a clip and it gets its own lane too.
You trim by dragging an edge, split at the playhead, and reorder by dragging. Ripple mode closes the gap behind a cut automatically, or you switch it off and move things by hand when you want the gap.
The part I noticed first was the scrubbing. The preview plays at proper speed while you drag the playhead, so you find the right frame by watching for it rather than nudging a timecode and waiting for the picture to catch up. On a room tour that matters more than it sounds, because the cut you want is almost always the frame where the camera stops moving.
Captions your own laptop writes for you

Drop a video or an audio file into the Captions panel and a speech model loads into the browser and does the recognition there. You get back a caption track with the timing already set, and you fix a bad line by typing over it.
Then you choose how it looks. There are 52 caption styles in there, from a plain white subtitle for a client walkthrough to the word-by-word pop that Reels and TikTok audiences now expect. If you want the text somewhere else, export the track as an .srt file and be done.
This is the feature that would otherwise cost you money. Most tools bill transcription by the minute, because they are running it on their hardware. A twenty minute walkthrough here costs nothing, because it is your CPU doing the listening.
A voiceover from a line you type

Write the sentence, pick a voice, and the audio lands on the voiceover lane already lined up with whichever clip you had selected. There are male and female voices in American and British English, with a speed control for when the read comes out slower than the cut.
The on-device voices are marked Free in the picker and they run on your machine the same way the transcription does. If you would rather use your own voice, drop the recording onto the same panel and skip the generating step entirely.
For a before-and-after piece this is genuinely useful. You can narrate the reasoning behind a layout change without setting up a microphone, and if the client asks you to reword one line, you retype it and regenerate that line only.
Titles that still move after you rewrite them

Add a heading or a body line, then set the font, size, fill, outline and glow. Or start from a preset that already moves: a neon flicker, a keyword pop, an RGB glitch, a gold shine, a karaoke highlight.
Nothing gets baked into a picture. Change the wording a week later and the animation still runs, because the motion is a property of the clip rather than a rendered image of your old text. Anyone who has ever had to rebuild a title card because a client changed one word will understand why that is worth mentioning.
Templates, transitions and filters

There are 150 templates across 12 categories, including intros, promos, social hooks, quote cards, event announcements and real estate. Applying one drops a finished scene onto the timeline with its text, motion and timing already in place, and then you swap the footage and rewrite the lines. Every template is free and none of them stamp anything on the export.

Transitions are the small detail that gives the tool away. You get 13 of them, dissolve, fade to black, white flash, four slide directions, zoom in, zoom out, two wipes, an iris and a blur, and each card previews using your own footage rather than a stock demo. You are looking at what your cut will do, not at what somebody else’s beach clip does.

The colour filters are 123 real lookup tables rather than a CSS filter sitting on top of the preview, and the same shader runs during the export. That distinction is the whole ballgame for interior work. Rooms are lit badly and inconsistently, you will be grading almost every clip, and a grade that looks right in the preview but ships differently is worse than no grade at all. There is a set built for skin tones and a set for night footage, which covers the two situations that ruin most walkthrough clips.
Music, stock footage and animated elements

The music library holds 45 tracks and 49 sound effects sorted by mood: upbeat, beats, electronic, chill, cinematic. The sourced tracks carry a CC0 or CC BY licence and the credit line sits next to the track so you can copy the attribution rather than go hunting for it. Read that line before you publish. Your own files work too, so an MP3, WAV, OGG or M4A dropped onto the panel goes straight to the audio lane.

Free stock video and photos from Pexels are searchable inside the media panel, with the length and the photographer’s name on every result, and one click puts a clip on the timeline at the playhead. It saves the usual detour of opening four tabs to download a single filler shot.

The elements panel carries 511 Lottie animations sorted into arrows and callouts, subscribe and follow prompts, checkmarks and reactions, holidays and celebrations. Arrows and callouts are the ones that earn their keep on a renovation video, because pointing at the thing you are talking about beats describing where it is in the frame.
What is actually free, with no trial attached
This is the list that matters, so here it is plainly:
- The full multi-track timeline editor, and the MP4 export
- No watermark on the file you download, and no intro sting either
- 720p and 1080p export, in 9:16, 1:1 and 16:9
- Automatic captions from on-device speech recognition, in 52 styles
- Subtitle export as .srt, separately from the video
- Text-to-speech voiceovers from the on-device voices
- All 150 templates across 12 categories
- All 13 transitions and all 123 colour filters
- 511 animated elements and overlays
- 45 music tracks and 49 sound effects
- Pexels stock video and photo search, built in
- Project export as JSON, so you keep a backup you control
- Sixteen standalone tools that do not ask you to sign in at all
The editor itself wants a free account, for the ordinary reason that your projects have to be saved somewhere you can get back to them. The standalone tools do not.
The AI features, and where they run
“AI” is doing a lot of unpaid work in tool marketing at the moment, so it is worth being specific about which parts here are actually models and where those models execute.
Speech to text. The captions and the transcripts come from a speech recognition model that downloads into your browser and runs there. No upload, no queue, no per-minute charge. This is also available as a standalone video to text page if all you want is a transcript.
Text to speech. The voiceover generation works the same way, from text you type, with the on-device voices marked Free in the picker. There is a standalone text to speech page for the same thing outside a project.
Image and video upscaling. There is a 2x AI upscaler for stills and another for short clips, both free, both without a watermark. For interiors the image one is the more useful of the two, because it rescues a before photo that was shot at the wrong size two years ago and is now the only record you have of the old room.
Batch AI video generation. There is an optional Chrome extension that drives Grok Imagine through a batch of prompts and drops the results into your PandaVid library. It is genuinely optional and the editor does not need it, so ignore this one unless generated B-roll is something you actually want.
Notice what is not on that list. There is no “AI edits your video for you” button, no auto-storyboard, no magic scene detection. That is a fair trade in my view, because the parts that are here are the parts that would otherwise have cost you a subscription.
Sixteen tools that skip the sign-in entirely
Some jobs are one-offs. You want a transcript, or an MP4 instead of the .mov your iPhone produced, and opening a project for that is overkill. Those live on their own pages under free video tools and run without an account.
The ones I reach for most often on a project:
- Trim video, which cuts the start and end off a clip without re-encoding it, so the picture stays identical to the original
- Compress video, which shrinks a file to fit a real limit rather than a vague quality slider: 10 MB for Discord, 16 MB for WhatsApp, 25 MB for email
- Resize video, which changes a clip to 9:16, 1:1 or 4:5 and shows you exactly what the crop cuts before you commit to it
- MOV to MP4, for the iPhone footage a client sends that their own laptop then refuses to open
- Extract audio, for when you only want what the client said on the site visit
The rest cover subtitle conversion, plain text from an .srt, audio transcription, voice recording and WebM to MP4.
The trimmer is the one worth knowing about even if you never open the editor. Most tools re-encode a clip when you cut it, which costs you a generation of quality on footage that was already compressed by a phone. This one copies the packets across instead, so a five second trim finishes in a moment and the picture that comes out is the picture that went in.
Where it falls short
No tool review is worth reading without this section.
Your computer does the work. This is the whole reason it is free and it is also the catch. A short social cut on a recent laptop exports in well under a minute. A long 4K timeline on a five year old machine takes a while, because your hardware is doing the encoding instead of somebody’s server. If your laptop already struggles with a big browser session, it will struggle here.
Chrome and Edge are the safe picks. Editing and preview work anywhere current, but the in-page video encoder is furthest along in those two. If a browser cannot encode in the page, that one export falls back to a server render, and the tool tells you it is doing that.
The music library is small on purpose. Forty-five tracks is not a stock music service. The upside is that every one of them has a checkable licence sitting next to it, which is more than can be said for a lot of larger libraries. Bring your own audio if you need a specific mood.
It expects a keyboard and a mouse. This is a timeline editor in a browser tab, and timeline editing on a phone screen is nobody’s idea of a good time. If your whole workflow lives on a phone, a phone app will suit you better.
How I would use it on an actual project
If you shoot rooms for a living, or you are documenting your own renovation, the sequence that works is roughly this.
Shoot your before footage in landscape even if the final piece will be vertical, because you can crop down later and you cannot crop back out. Get one slow pass of each room and one static shot from the doorway. During the work, take thirty seconds of anything noisy or dramatic, because that is your mid-roll.
When the room is finished, shoot the after pass from the same doorway position as the before. That single bit of discipline does more for the finished video than any transition in any editor.
Then: build the sequence on Main, put the before shot on Overlay so you can cut between them at the same camera position, drop a voiceover over the reasoning, let the captions generate themselves, grade every clip with the same filter so the rooms match, and export at 1080p. If you are posting to more than one platform, resize the export rather than rebuilding the edit.
It is also worth remembering that a video does a different job from a render or a mood board. If you want the reasoning behind that, we have covered how interior visuals help people understand a space before it exists in more detail elsewhere on the site.
Common questions
Is it genuinely free, or free until the export button?
Free at the export button, which is the only test that counts. The timeline, the captions, the voiceovers, the template library and the 1080p export all cost nothing, and there is no watermark on the downloaded file.
Do my videos get uploaded anywhere?
Playback, editing, transcription and the export all run on your device, so your footage stays on it. Two things move it, and both are visible: saving media to your PandaVid storage so you can pick a project up on another computer, and the fallback where a browser that cannot encode in the page hands that one export to the server.
Can I add subtitles without typing them?
Yes. Drop the clip into the Captions panel, let the speech model transcribe it in the browser, correct any line by typing over it, then either burn the captions into the video or download them as an .srt.
Do I have to install anything?
No. It opens in a normal browser tab on Windows, Mac, Linux and ChromeOS. The Grok extension is separate and optional.
Worth a tab
The honest summary is that PandaVid is a real timeline editor that happens to be free, rather than a free tool that is pretending to be an editor. For anyone producing room tours, before-and-after reels, client walkthroughs or staging videos, the combination that matters is the multi-track timeline, the captions you did not have to type, and an export with nothing stamped on it.
The catch is that your own machine does the encoding, which is a fair price for not being billed per video. If your laptop is reasonably recent, it is worth a tab.